
Let’s face it, planning for a long-distance hiking adventure can be daunting; there are a LOT of details to take into consideration. Before you can begin any overnight excursion out on the John Muir Trail (JMT), you will need to acquire a wilderness permit. This post offers a hassle-free step-by-step guide for obtaining a permit to hike one of the most iconic trails in the United States. As long as you have an open mind to hiking a non-traditional route (although it is becoming more and more desirable these days), then you can easily obtain your permit within a matter of hours…no waiting and no rejections.
**UPDATE: This post has been revised for 2020. There has been a lot of discussion regarding changes to the wilderness permits assigned by Inyo National Forest. As of 2/14/20, the Forest Service website states, “If you have a break in continuous wilderness travel, a new permit would be required from the agency where the next section of your trip begins. The Inyo National Forest will make an exception for JMT hikers to exit for a reasonable period of time necessary for resupply.” So, if you need to leave the trail for a day to resupply in Independence, you will not invalidate your permit, as was previously stated earlier this year.**
‘Continuous wilderness travel’ was previously defined here by the Forest Service. The definition has since been removed; however, it is assumed that as long as you don’t leave the trail for an unreasonable amount of time, more than necessary for resupply, then your permit should remain valid.
These instructions pertain to a northbound (NOBO) route starting at Horseshoe Meadow, hiking over Cottonwood Pass Trail then up the Pacific Crest Trail (PCT) until you intersect the JMT. You will need to travel east on the JMT to ascend Whitney and then back out retracing your path to continue up northbound on the JMT. This does add some additional miles to your trip (it is about 30 miles from Horseshoe Meadows to the Whitney Summit); however, this route does have its advantages.
Advantages
- You don’t have to enter the John Muir Trail Yosemite Permit Quota/Lottery System and hope you are lucky enough to obtain a permit (this is for a southbound hike)
- Exiting the JMT at Mt. Whitney via Mt. Whitney Trail to Whitney Portal is subject to a daily quota. This complicates the planning process
- Entering the JMT via Whitney Portal is subject to a lottery system. These permits are in extremely high demand.
- You will be lightening the load of traditional entry points for the JMT (Happy Isles/Yosemite and Mt. Whitney/Whitney Portal)
A little-known perk for obtaining a wilderness permit starting at Cottonwood Pass is that your Inyo National Forest wilderness permit is valid for hiking Half Dome! No need to enter yet another lottery. This is one of only two exceptions allowed to hike Half Dome with a wilderness permit issued outside of Yosemite (the other exception is a wilderness pass issued for Cottonwood Lakes trailhead).IMPORTANT UPDATE!!!: This perk had expired at the end of the 2018 hiking season; there will be no exceptions starting in 2019.
Disadvantages
- You will need to acclimate to altitude elsewhere before venturing out on this endeavor. Horseshoe Meadows and the walk-in campground resides at 10,000 feet above sea level. Therefore, you will not have the convenience of gradually acclimating to the altitude as you would if you were to start in Yosemite Valley and hike southbound on the JMT.
- You will be adding some additional miles to your trip, and you will be re-hiking a segment of the JMT that you already hiked. It is approximately 30 miles from Horseshoe Meadows Campground to the summit of Mt. Whitney; however, if you were to enter/exit at Whitney Portal, you would have to hike about 9 miles along the Mt. Whitney Trail, so taking that into consideration, it adds only 20 miles to your trip.
- Starting the trail at this end, some would say that you would be hiking the hardest part of the trail first. While trekking this portion of the JMT, you will be traversing the highest points of the trail at the beginning of your hike, the terrain itself isn’t any more difficult than some other sections that are considered to be tough. I think the perception that this is the most difficult portion of the trail is mostly because of the fully-loaded pack that you are bearing, and the fact that you are adjusting to the altitude. At this point you don’t yet have your ‘trail legs,’ but as you go along you get stronger, and hiking starts to feel more comfortable. The JMT is a challenging trail, regardless of direction, but I think you also adjust mentally after a while and begin to embrace the challenges, so as time passes, it appears to get ‘easier’ (it doesn’t really get easier, but you are able to endure more).
Step I – Plan your itinerary
There is some advance prep-work that you will need to do before beginning the application process, which is the stage I found to be rather tedious. You will need to provide a detailed trip itinerary with your permit application; in other words, you will need to specify a camping area location for every night you are on the trail. Although it is mandatory to start on the start date and trailhead as specified, you are not expected to adhere to the itinerary strictly, you do have flexibility and can camp wherever you choose and exit when you desire just as long as it’s before you permit expires (with the exception of an exit at Whitney Portal, you are bound to a strict end date due to the quota). Providing a detailed itinerary helps the forest service limit the traffic load on the trail at any given point and can also serve as a reference which can help to locate you in the event of an emergency or if you are reported overdue or missing.
Note: At the time of updating this post, it appears that the newly designed recreation.gov website will allow you to proceed with checkout without filling in the camp locations fields. This may be an oversight and could be corrected in the future, so I would go into the permit application process with at least some idea of what your itinerary will be. However, I know for a fact that when you go to pick up your permit, you will be required to provide camping locations, so I recommend to be prepared.
The trip itinerary drop-down list is organized in alphabetical order. After having to endure an agonizing camping location selection process in past years, the forest service has finally provided a printable list of itinerary locations on the JMT. This list will help you outline the itinerary of your hike for the permit.
I personally used a combination of different tools to plan out my hike:
- The principal instrument used is the Guthook Guides for iOS. I have used Guthook’s apps for the AT, PCT, and JMT and found it a perfect complement to the other guides that I have used both for planning and on-trail navigation. It is the easiest way I’ve managed to calculate distances between A and B by taking terrain into account. You can easily create trip segments into realistic targets.
- National Geographic John Muir Trail Topographic Map Guide – This is a waterproof, tear-resistant, and compact guide that maps out the entire JMT. Not only can you visualize the terrain at-a-glance, but you can also see various landmarks that do not exist in the Guthook Guides.
- Elizabeth Wenk’s books ‘John Muir Trail: The essential guide to hiking America’s most famous trail‘ and ‘John Muir Trail Data Book‘. These two items contain information (such as resupply information, campsite locations, and narratives that walk you through the trail) that is extremely helpful in planning your hike.
- Excel – I created a spreadsheet containing the dates and itinerary locations for my hike. Excel is very efficient because you can quickly calculate the mileage between any given points if you have the mile markers (which Guthook Guides and Elizabeth Wenk’s guides have). Not only can it crunch some numbers, but it also creates a very organized list that you can filter, sort, etc. (If you are interested in taking a look at my comprehensive planning workbook, see my post ‘The John Muir Trail and Thru-Hike Planning – An Excel Workbook to Plan Your Hike!‘)
Between these three tools, I was able to plan out my hike and make an educated guess about which location items to choose for the itinerary.
Step II – Apply for your permit
Now that you have your itinerary all figured out, you can begin the permit application process. A few things that will be helpful to know before going to the Recreation.gov website to obtain your permit:
- As part of the checkout process, you will need to create an account with Recreation.gov to reserve your permit. The first time I applied for a permit I did it as part of the process, but you can save some time by doing it ahead of time.
- You can request your permit up to 6 MONTHS before your START DATE. The system will not let you apply for a permit sooner.
- You will have only 15 minutes to complete your application, so I highly recommend putting in the effort beforehand and completing ‘STEP I – PLAN YOUR ITINERARY’ (above) first. Otherwise, you can run out of time and will have to start all over again. I’ve had this happen the first time I ever did this, and trust me; it’s incredibly frustrating!
- Be conservative when choosing your end date! If you complete your hike ahead of schedule, that is not a problem; however, if you try to hike through Yosemite with an expired permit (because you took longer than expected), then this could present an issue…especially if you decide to camp at the Backpacker Campground in Tuolumne Meadows.
- A permit can only be picked up by the group leader or the person specified as the alternate leader on your permit. If you are hiking with multiple people, you may want to designate alternative leaders as a backup.
The step-by-step process
(For your convenience, I’ve provided a printable version of this step-by-step process, so you don’t go mad trying to follow these difficult to follow on-screen instructions.)
- Go to the Recreation.gov website and type ‘Inyo National Forest – Wilderness Permits’ in the search field. Select the wilderness permits selection from the drop-down and then on the next screen, click on the ‘View Details’ button.
*Or you can just click here if you don’t feel like typing and clicking.


2. On the next screen, you can take a quick look at the ‘Important Dates’ as there is a special quota season for Cottonwood Pass. If you want to acquire a permit to hike before the quota season begins, you cannot reserve one online and will need to visit an Inyo National Forest Permit Issuing Location to obtain a walk-up permit for the non-quota season.

3. When you’re ready, scroll back up and hit the button to ‘Explore Available Permits’

4. NOTE: For the purpose of illustrating the permit process, I’ve chosen ‘Cottonwood Lakes’ since, at the time of updating this post, I was unable to select Cottonwood Pass. You will select ‘GT60 – Cottonwood Pass’, unless you would prefer to hike out of Cottonwood Lakes.
On the ‘Detailed Availability’ screen, select ‘Overnight’ for the type of permit, then enter the date you want to begin your hike and the number of people in your group.
Answer the question ‘Is this a commercial guided trip? This can include an Outfitter, Guide, or pack Outfitter?’ If you select ‘Yes’ you will receive a message that you must coordinate your trip with that guide.
Scroll down to ‘GT60 – Cottonwood Pass’ and if there’s availability (the field will be blue and display the available number of permits), select the date you want. If you’re unfortunate enough to have no availability for the date you selected, choose ‘Next Available’ to see what options you have.
You could alternatively take the Cottonwood Lakes trail, which also starts in the Horseshoe Meadow area, but it is a more difficult trail and a little bit out of the way. Click here for a copy of the Horseshoe Meadow area trail map that will illustrate the difference between entering at Cottonwood Lakes trail and Cottonwood Pass trail.
Once you’ve selected an available date, click on ‘Book Now’

5. If you not already logged in, you will be asked to do so. (If this is your first time visiting the newly updated recreation.gov website, you will need to reset your password.)
After you’ve logged in, fill in your Permit Holder information (this information here is for the group leader).
It is recommended you add your other group members as alternate permit holders (up to 3 persons) in the event you yourself cannot pick up the permit.
Will you be trekking up Mt. Whitney? If so, select ‘Yes’.

6. Now for the tedious part of the permit application process…entering your trip itinerary. Hopefully, you’ve heeded my advice and already determined your camping locations for each day prior to getting to this step.
In Section 1 of the ‘Trip Itinerary’ section, enter your exit date (the date you expect to complete your hike). When you do this, Section 2 will populate with fields that you will need to fill in with anticipated camping locations. As I mentioned in ‘STEP I – PLAN YOUR ITINERARY’, the drop-down list is cumbersome, and you will be tempted to select the option “Other / Don’t Know”. If you choose this option too many times, you may not be able to complete your application. This information is vital to provide useful information for SAR (search and rescue) in the event of an emergency.
Filling in these fields is not straightforward. To see the locations available, click in the field and hit the down arrow on your keyboard, this will pull up the full location list to select from.
After selecting your camp locations for each day in section 2 of your ‘Trip Itinerary’, select your exit point (where you plan to end your hike) in the ‘Entry & Exit Points’ section.

7. Group size appears again here, why, I don’t know. Perhaps the time in between when you looked for permit availability and the time you entered your camp locations, you decided that you don’t like one of your group members anymore and you want to cut them out of the hike? Or perhaps you are now mad at them for making you complete this tedious application, and you decided they should fill out their own application? Most likely, you can just ignore modification of this field, but make sure it contains the correct number of group members.
Next, select your travel method. I’ve selected ‘Foot’ since I don’t plan on using a dog sled (yes, that’s actually an option!)
Indicate whether or not you will be bringing any animals. (Note that dogs are not allowed on any parts of the trails in both Yosemite and Sequoia / King’s Canyon, which is a good portion of the JMT.)

8. In the next section, select the ‘Issuing Station’ where you plan to pick up your permit (this can be changed later on if necessary)
The addresses of the permit-issuing stations can be found here.

9. The ‘Need to Know’ section contains important information regarding your permit as well as a quick safety overview. Be sure to read this section and acknowledge that you’ve read the information by checking the box next to ‘Yes, I have read and agree to the Need to Know information.’

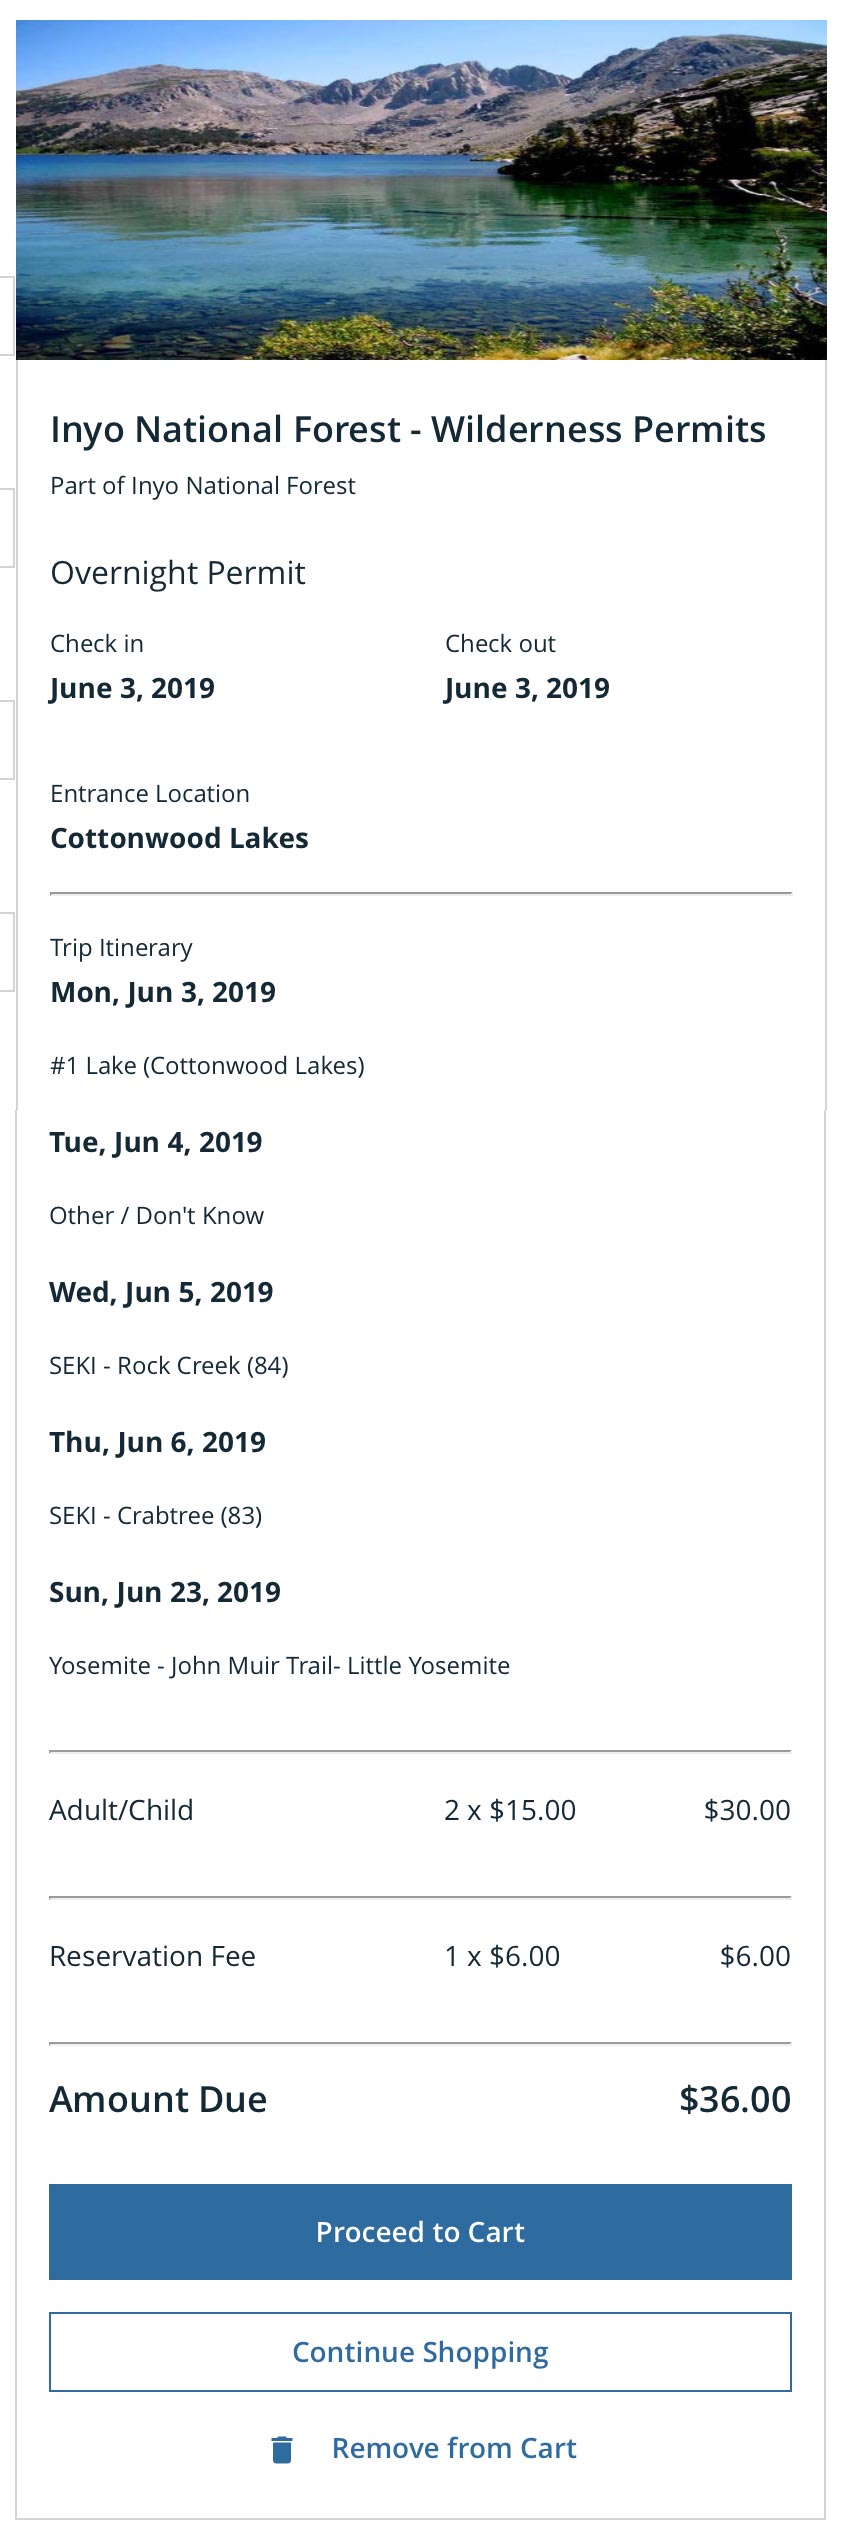
10. Proceed to your cart and complete the checkout process.
Congratulations! You have obtained the wilderness permit you need to hike the JMT!
You may pick up your permit up to 2 days in advance at the issuing station that you selected on your application.
Don’t forget to obtain a California Fire Permit for your hike on the JMT. A special permit is required on the National Forest sections of the JMT for the use of the stove you will most likely be using to rehydrate your food. You can obtain your California Campfire Permit online or at any Forest Service, BLM and Cal Fire office in the state.
Resources:
- The John Muir Trail and Thru-Hike Planning – An Excel Workbook to Plan Your Hike! – This post contains a link to download an Excel workbook that I’ve used to help organize and plan my JMT hikes.
- Half Dome Permits for Backpackers – Link to the Yosemite National Park website containing information for Half Dome Permits for Backpackers
- Itinerary Locations on the JMT – This is a downloadable PDF that lists all the JMT locations listed in the itinerary dropdown for permit application. This list includes mileage markers and elevation to make trip planning a little easier.
- SEKI Backcountry Zones Map – A convenient SEKI Backcountry Zones Map that someone named ‘tomba’ posted on a High Sierra Topix Forum
- Cottonwood Pass Trail Information – Some info about the Cottonwood Pass Trail on Inyo National Forest website
- Cottonwood Pass Trail Recreation Guide (pdf)
- Cottonwood Pass Walk-In Campground Information – Information on the Inyo National Forest website
- Horseshoe Meadow Area Campgrounds Guide (pdf)
- Horseshoe Meadow Area Trail Map (pdf)
- Guthook Guides iOS app
- Inyo National Forest Service Wilderness Permits & Reservations Information – Wilderness permits are required year-round for the following:
- All overnight /multi-night trips in the Ansel Adams, John Muir, Hoover, or Golden Trout Wilderness
- All overnight /multi-night trips that start in Inyo National Forest and will travel in Yosemite, Sequoia or Kings Canyon Wilderness
- Day use and overnight into the Mt Whitney Zone
- Inyo National Forest Service Permit Pickup Instructions – Instructions regarding checking in at the visitor center to pick up your wilderness permit. Reserved permits can be issued one or two days before the trip. How to request a permit without a reservation is described under “Walk in Permits” on this page. You will also find the addresses of the different permit-issuing stations here.
- California Campfire Permit Online Application – Campfire Permits are required for the use of portable stoves on federally controlled lands. You may apply for one online.
- National Geographic John Muir Trail Topographic Map Guide – A handy compact tear-resistant, waterproof map that you can purchase on Amazon.com
- ‘John Muir Trail: The Essential Guide to Hiking America’s Most Famous Trail’ by Elizabeth Wenk – A guide that provides all the necessary information you will need to plan your JMT hike. It contains details about food resupplies, trailhead amenities, and travel from nearby cities (note: this book is written for going north to south. If you want a version that is meant to use to travel south to north, you will need to download the Kindle version).
- ‘John Muir Trail Data Book’ by Elizabeth Wenk – (can be used north-south/south-north) – This is a scaled-down version of the ‘John Muir Trail: The Essential Guide to Hiking America’s Most Famous Trail’ that you can carry with you. It contains on-the-trail information, including custom-made topographical maps, elevation profiles, data tables, and labeled panoramas from prominent passes. (This book is also available in Kindle version.)
Additional Reading:
- Why Hike the John Muir Trail?
- Oh dear God! Not Shepherd Pass! (An Odyssey on the JMT)
- What I’ve Learned While Backpacking the John Muir Trail

